How to Melt Chocolate: Methods and Tips
An operation as common as it is tricky, because the result is often opaque and lumpy. Here is a short guide on the techniques that can be used (bain-marie, microwave, oven), the melting temperatures for the different types and the mistakes to avoid.

A common step in many pastry preparations, including home-made, melting chocolate is useful for making creams, mousses, ganaches, glazes and even scenic decorations. The difficulty levels can be different, but for each one it is essential to obtain a perfect result, which above all means a shiny appearance and a fluid consistency, where lumps are not allowed. Before introducing the techniques available, it is important to remember that there are different types of chocolate. In dark chocolate, milk chocolate and white chocolate the composition of the ingredients changes (between cocoa mass, sugars and cocoa butter), thus having different melting temperatures: the first melts between 122°F/50°C and 131°F/55°C, the second around 113-122°F/45-50°C, while the third, being practically devoid of mass, has a lower melting point, which stands at around 113°F/45 °C. Below, we will see how to best melt chocolate without compromising the texture and flavor, burning it and making it grainy.
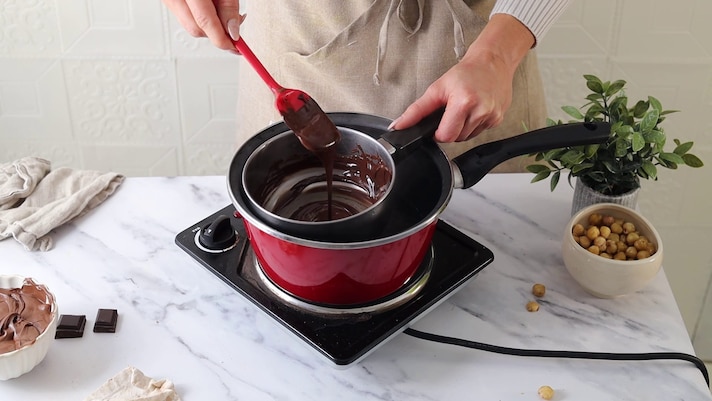
Melt the Chocolate in a Bain-Marie
The bain-marie method is one of the simplest and most reliable methods for success, although it is best to follow a few precautions to avoid unpleasant surprises. First, reduce the bar into small pieces of the same size: the best thing is to chop it coarsely, so as to ensure uniform melting, and transfer everything into a steel or borosilicate glass bowl. At this point, fill a saucepan or pot (depending on the size of the container) with a little water and bring to the boil. Lower the heat slightly (or the induction temperature) and place the bowl with the chocolate on top, making sure that the bottom does not touch the water. Mix gently with a silicone spatula. The chocolate will melt slowly, slowly thanks to what is called the indirect method, with the element that produces heat that does not come into contact with the chocolate.
Melt the Chocolate in The Microwave
A very popular solution, because it is practical and fast: the microwave is the protagonist. As is well known, the distribution of heat in foods when they are heated in this appliance is not homogeneous and for this reason a very precise strategy must be implemented. To obtain a top consistency, it is necessary to chop the chocolate into small pieces, trying to make them the same size and put them in a suitable container . Set an average temperature of 600 watts, close the door and start melting the chocolate for 30/60 seconds. The secret is to perform the operation in short intervals, of about 30 seconds at a time, stirring between one pause and the next to distribute the heat. Choose this option when you have small quantities of product to melt, perhaps to be inserted into a dough or for a simple final garnish, so you will optimize the times.
Melt the Chocolate in a Traditional Oven
Although it is a less popular option than the previous ones, a traditional oven can also be used. How is it done? The procedure involves preheating the oven in static mode at a low temperature, around 122°F/50°C (which is not possible in all models) and placing the chopped chocolate in a suitable baking dish. Once in the oven, the heat will slowly distribute and the chocolate will begin to melt. Even in this case, however, it is necessary to stir from time to time, always to have a homogeneous melting and prevent the risk of burning, especially on the surface.
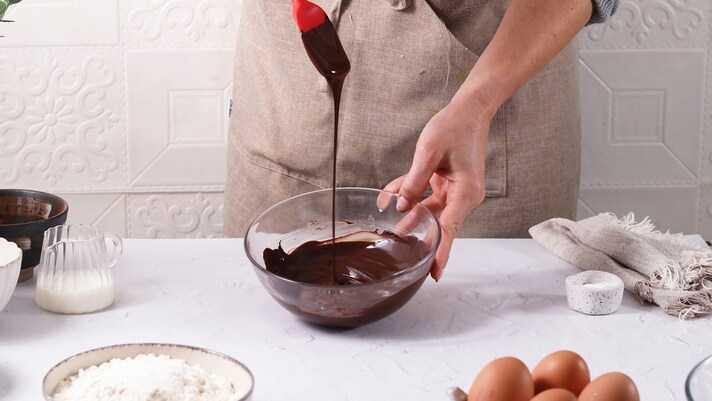
How to Melt it To Make Smooth, Lump-Free Icings and Creams
The real challenge when dealing with melted chocolate is to obtain a smooth and velvety texture, very important when you need to make coating glazes or ganache-type creams. Avoid thermal shocks: the ingredients that are added to the chocolate, such as cream, butter or milk must be at room temperature or slightly warmed. A sharp contrast could make it become grainy. The tools used also make their contribution: for example, in a ganache, after pouring the cream on the chopped chocolate, emulsify with an immersion blender to have a shinier and silkier compound.
More Tips for a Perfect Result
We conclude with some further suggestions for expertly crafted melted chocolate.
- Choose a quality chocolate: by reading the label on the package, aim for a product where the ingredients are balanced and where cocoa butter is the only fat present.
- Do not melt directly in the saucepan on the stove: the contact between the chocolate and the metal will cause the heat to spread too quickly, risking burning it.
- Do not add water: if the chocolate is too thick during melting, you can correct it with a little butter, cream or milk, which are fatty foods, while with water you would obtain the effect of separating the mixture, developing lumps.
- Check the room temperature: if the room you are in is too cold, the chocolate may cool and solidify again quickly, making it difficult to work with. The ideal temperature is between 68°F20°C and 75°F/24°C.


;Resize,width=767;)
