
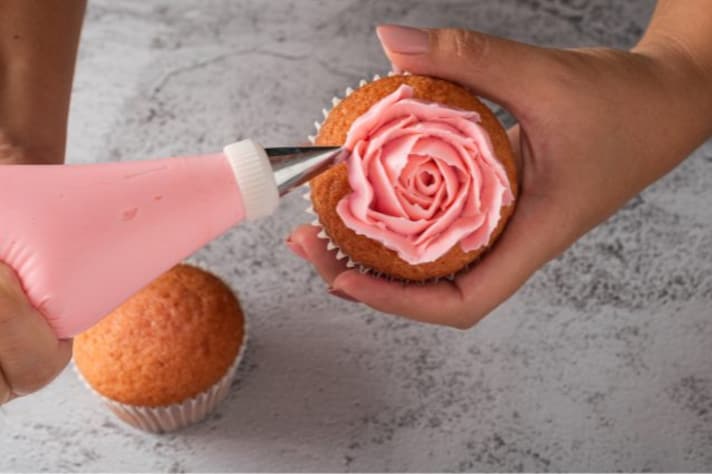
We’ve all seen it—those pros on cooking shows who handle a piping bag like it’s a breeze, effortlessly swirling buttercream onto cupcakes, making it look like a walk in the park. But if you’ve ever tried it at home, you know it’s more like climbing a mountain. You’re red-faced, hair plastered to your forehead, covered in frosting with sticky fingers and a piping bag that’s somehow coated in grease before you’ve even started. It’s enough to make you want to toss the whole thing into the sink and never look at a cupcake again. But don’t worry, everyone has been there! The secret? Knowing how to fill that pesky piping bag without it turning into a frosting battlefield.
The Best Way to Fill a Piping Bag
Before you even think about filling your piping bag, the first question is: should you use a coupler or go without? A coupler is a nifty little two-part tool that allows you to change the piping tip without having to empty and refill your bag. Sounds like a dream, right? For beginners or anyone who wants a flawless switch between designs, a coupler is your best friend. It keeps everything in place and offers more control. However, if you’re working with a single tip and a one-and-done design, skipping the coupler can be quicker and just as effective. It’s all about what you need for the task at hand. Coupler or no coupler, the trick is getting the filling into the bag without making it look like an icing explosion.
How to Fill the Piping Bag with a Coupler
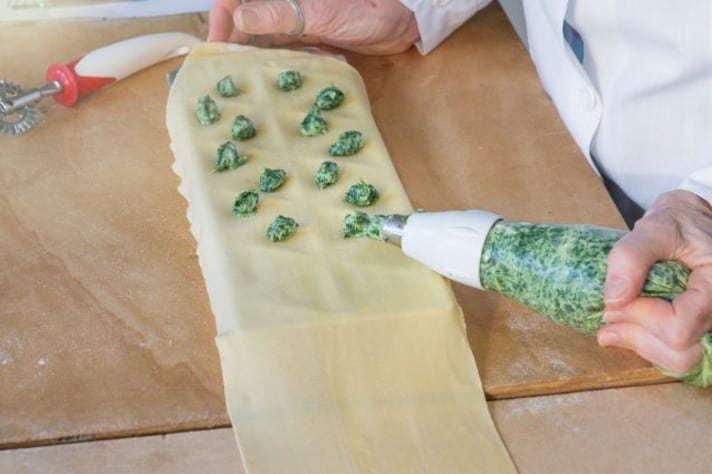
Now, let’s get to the nitty-gritty: filling your piping bag using a coupler. First, snip the tip of your piping bag to fit the base of the coupler snugly—don’t overdo the cut, or your frosting might escape from the sides. Slide the base of the coupler into the bag and push it down to the tip, making sure it’s secure. Once you’ve placed the desired piping tip on the outside, screw the ring of the coupler on to hold everything in place. Now, here comes the fun part (and by fun, I mean the part that often gets messy): the filling.
The easiest way to fill the bag without splattering frosting everywhere is to fold the top of the bag over your hand or a tall glass, creating a sort of cuff. This keeps the sides of the bag clean and gives you more control. Spoon in your frosting or filling, carefully guiding it into the bag without overstuffing—about halfway full is perfect. Unfold the top, twist it closed, and there you go: a neatly filled piping bag with no sticky disasters. Now, just squeeze gently, and you’re ready to pipe like a pro.
How to Fill a Piping Bag When You Don't Have a Coupler
What happens if you don’t have a coupler? No big deal, it’s still totally doable. In fact, some bakers prefer the simplicity of skipping the coupler altogether. Maybe you’re in a rush, or perhaps you’re working with a large piping tip that doesn’t need to be swapped mid-project. Whatever the reason, filling a piping bag without a coupler follows a very similar approach to the coupler method, with one key difference: you’ll need to be extra cautious when cutting the tip of the bag.
Cut just enough of the bag’s tip for the piping tip to fit snugly inside. You don’t want it to pop out while you’re working (talk about a frosting catastrophe). Once your tip is in place, fold the top of the bag over your hand or glass, fill with frosting as before, and twist the top to seal it. One important thing to remember here is that without a coupler, you won’t be able to switch tips easily, so make sure you’re set on your design before starting. No pressure, though—just remember to keep your hands steady, and soon you’ll be piping away without a hitch.
What About Paper Piping Bags?
Now, what if you’re not using a plastic piping bag but a paper one? The good news is the overall process is quite similar, but with a few tweaks. Paper piping bags, often made from parchment, are great for smaller tasks or when you’re in need of a disposable option. You’ll actually start by folding the parchment into a cone shape. If you’re feeling fancy, you can cut a triangle from the paper and roll it into the cone yourself, ensuring that the tip is as tight as possible. Once that’s done, snip off the point to fit your piping tip (or just a small hole if you’re not using a tip at all).
Filling a paper piping bag is similar to filling the plastic ones—fold the top over, spoon in your frosting or filling, and twist the top closed. The key difference with paper bags is that they’re a bit more delicate, so handle them gently and avoid overfilling to prevent tears. Once filled, they work just like their plastic counterparts, but they offer a more eco-friendly and disposable option for quick jobs.
;Resize,width=767;)
