

Sometimes, the urge to bake strikes and you find yourself craving a freshly baked cookie with a personal touch. But what if you're out of cookie cutters or don't have any fancy molds? Don't let this curb your cookie enthusiasm! An unexpected kitchen tool, the skimmer, can be your secret weapon for crafting cookies that are as delightful in shape as they are delicious.
How to Shape Cookies With a Skimmer
A skimmer typically used for straining might not seem like an obvious choice for cookie making, but its unique structure can add an artistic touch to your usual cookie routine. The process is straightforward and allows for creative expression in your baking. Start by preparing your basic cookie dough. In a large bowl, whisk together eggs, sugar, a splash of vanilla extract, and a pinch of salt until the mixture is light and fluffy. Gradually fold in the flour and cubed butter, mixing until a soft dough forms. Now comes the creative part: instead of rolling out your dough and cutting it into shapes, grab your skimmer.
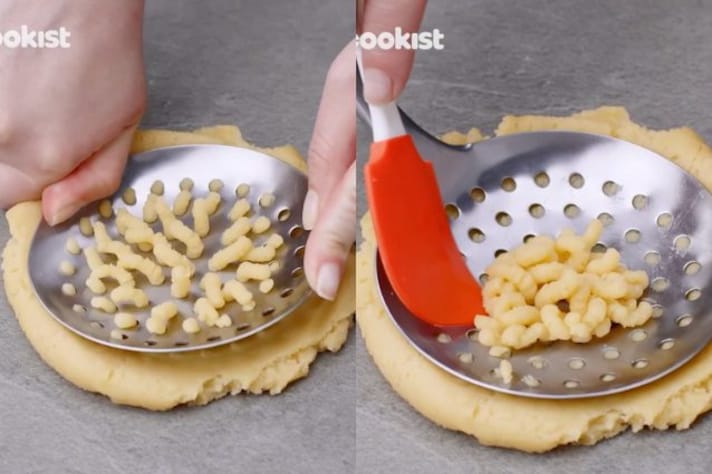
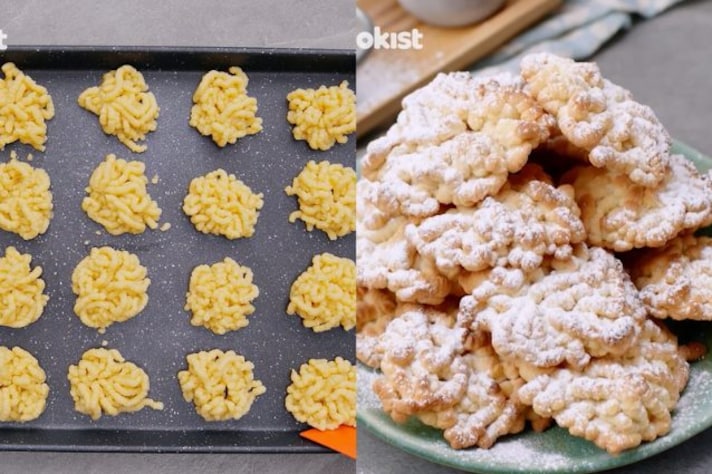
Place a small ball of dough on a flat surface and gently press it down with the skimmer. The mesh of the skimmer not only flattens the dough but also imprints a beautiful pattern, turning each cookie into a work of art. Once shaped, place your cookies on a baking sheet and bake at 170°C (340°F) for about 20 minutes or until golden. A final dusting of powdered sugar adds a sweet finish to these charming treats.
How to Make Cookies Keep Their Shape?
One of the key challenges when baking cookies, especially those with intricate designs from a skimmer, is keeping them from spreading too much and losing their shape in the oven. To ensure your cookies hold their beautiful patterns, start by using chilled dough; this slows down the spread during baking. Additionally, the type of fat used can affect how much the cookies spread. Butter gives a delicious flavor but can cause more spreading, so for firmer cookies that better retain their shape, consider using half butter and half shortening. Another tip is to use parchment paper or a silicone baking mat, which provides a non-stick surface and helps distribute heat evenly, further helping to maintain the cookie shapes. Lastly, avoid opening the oven door frequently, as the fluctuating temperatures can also cause the cookies to spread. By following these tips, your skimmer-patterned cookies will come out looking as good as they taste.
Some Cookies Variations to Try With The Skimmer
While the basic skimmer cookies are delightful, experimenting with additional flavors can elevate your creations. Imagine infusing the dough with lemon zest or a dash of cinnamon for a warm, spicy note. Incorporating finely chopped nuts like almonds or walnuts provides a lovely crunch and richness, complementing the delicate texture imparted by the skimmer's pattern.
For those who adore a touch of extravagance, why not drizzle melted chocolate over the cooled cookies? The chocolate settles into the grooves created by the skimmer, enhancing both flavor and appearance. Alternatively, a sprinkle of sea salt can balance the sweetness and add a contemporary twist.
Baking Tips for Perfect Cookies Every Time
Achieving the perfect cookie involves more than just a great recipe and a creative shaping tool. Here are some additional tips to ensure your cookies come out beautifully every time:
- To prevent uneven cooking, make sure to space your cookies uniformly on the baking sheet.
- If the dough is too soft or sticky, chill it for about 30 minutes before shaping. This makes handling easier and helps retain the intricate design from the skimmer.
- Keep an eye on your cookies as oven temperatures can vary. Remove them when they are just turning golden to avoid overbaking.
;Resize,width=767;)
