Extremely Easy Christmas-Themed Polar Bear Cookies

These Christmas-Themed Polar Bear Cookies we have made here are easy and delicious cookies made with whipped shortcrust pastry, which children will love, ideal for serving as an original and delicious snack.
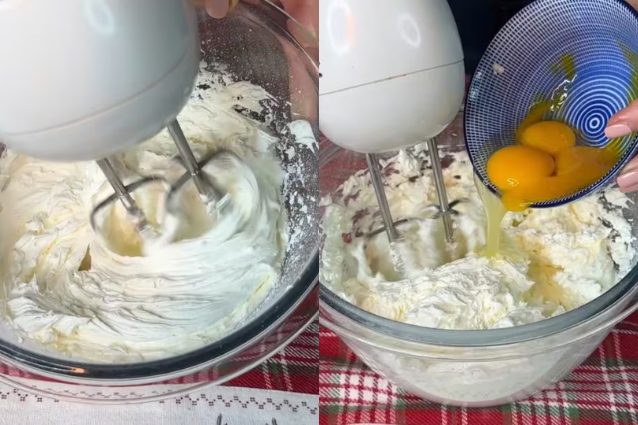
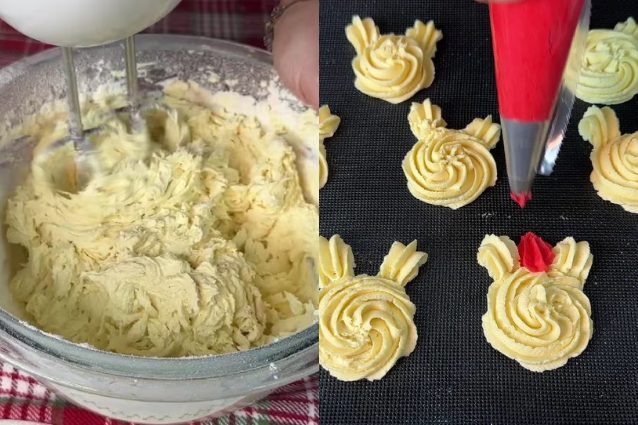
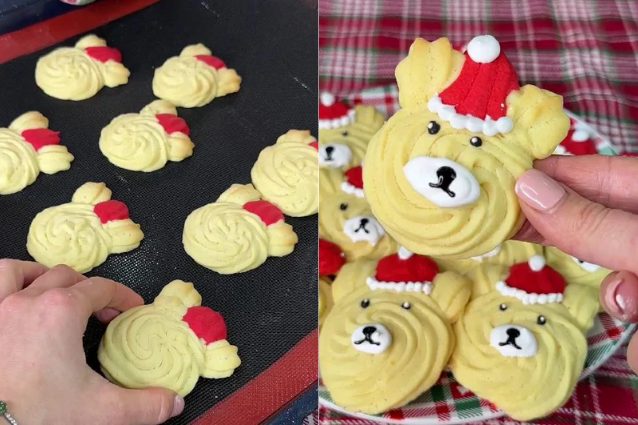
To prepare them we whipped the butter with the powdered sugar before adding the eggs, flour, potato starch, salt and grated lemon zest. A little red food coloring will be added to a small part of the pastry, so as to create Santa's hat for the teddy bear. We then decorated the cookies with royal icing and melted chocolate.
What Are Christmas Polar Bear Cookies?
These cookies are perfect little treats to prepare for the coming Christmas season. The history of shortcrust cookies dates back centuries, and they have been a staple in European baking, especially in Italy, where regional variations are common. In Italy, cookies like these are often made for special occasions such as Christmas or Easter, with intricate decorations and vibrant colors. The use of royal icing—which is typically made with egg whites and powdered sugar—further adds to the festive nature of these treats, making them perfect for gifting or serving at celebrations.
These cookies may be part of the broader tradition Christmas cookies or even decorating cookies, which are popular during the holidays. The vibrant red color, likely symbolic of Christmas, combined with the buttery texture and intricate icing, aligns with many Italian pastry traditions, where cookie-making is an art form passed down through generations.
Pro Tips for The Best Christmas Polar Bear Cookies
- Ensure the butter and eggs are at room temperature for a smoother, more evenly mixed dough. This helps achieve the light and fluffy texture you want.
- Always sift the flour, potato starch, and salt before adding them to the dough. This ensures there are no lumps and creates a smooth, uniform dough.
- Once the flour is incorporated, avoid overworking the dough. Overmixing can result in tough cookies instead of light, crumbly ones.
- If the dough feels too soft or sticky, chill it in the refrigerator for 15-20 minutes before piping. This will make it easier to handle and prevent the cookies from spreading too much while baking.
- Since butter is a key ingredient in this recipe, using high-quality unsalted butter will enhance the flavor and texture of the cookies.
- For uniform cookies, make sure to use a star-shaped piping tip when transferring the dough to the baking tray. This will help achieve the traditional star shape and create a beautiful texture.
- Before decorating, make sure the cookies are completely cooled. This ensures the royal icing or chocolate doesn’t melt and helps the decorations set properly. After decorating with royal icing or chocolate, give the cookies plenty of time to dry completely. This will ensure the decorations harden and won’t smudge when you handle them.
Can I Flavor The Cookies With Something?
Yes, you can flavor the whipped shortcrust pastry with various ingredients to customize the taste. For example, you could add vanilla extract, almond extract, or citrus zest (such as orange or lemon) for a fragrant twist. Additionally, a pinch of cinnamon, nutmeg, or cocoa powder can infuse the dough with warm, spiced flavors, perfect for holiday cookies. Just be sure not to add too much liquid, as it can affect the dough's texture.
What if I Don't Have a Piping Bag?
If you don't have a piping bag, you can use a plastic sandwich bag as a makeshift piping bag. Simply fill the bag with dough, cut a small tip off one corner, and pipe the dough onto the baking sheet. Alternatively, you can use a spoon to shape the dough or form it by hand into small portions before baking.
Why is My Cookie Dough so Hard?
The cookie dough might be hard if it's over-mixed or if too much flour was added during preparation. Overworking the dough can cause the gluten to develop, making it tough. Additionally, chilled dough can be firmer, so if the dough was refrigerated before shaping, it might need to be softened slightly at room temperature to make it easier to work with.
What Else Can I Use as Decorations?
In addition to royal icing, you can use a variety of other decorations for these cookies. Colored sprinkles, sugar pearls, or edible glitter can add sparkle and a festive touch. Melted chocolate (white, milk, or dark) can be drizzled or piped onto the cookies for added flavor and decoration. You can also use candied fruit, chopped nuts, or even dried edible flowers for a more creative, personalized look.
Can I Make These Cookies Ahead of Time?
Of course! You can bake the cookies and store them in an airtight container for up to 1-2 weeks. Alternatively, you can prepare the dough and refrigerate it for up to 2 days before baking. Once baked and cooled, they can be decorated and stored until you're ready to serve them.
Do They Freeze Well?
They do! After baking and cooling, you can store them in an airtight container or freezer bag for up to 2-3 months. It's best to freeze the cookies without decoration, then add the icing or other toppings after thawing. When ready to serve, simply let them come to room temperature before decorating or enjoying.
More Christmas Themed Cookies You Need to Try!
Classic Christmas Sugar Cookies
How to Store Christmas Polar Bear Cookies?
You can store the Christmas Polar Bear Cookies for 3-4 days in a tin or an airtight container.
Ingredients
How to Make Christmas Polar Bear Cookies
;Resize,width=712;)
Whip the softened butter with the powdered sugar until you get a light and fluffy mixture. Gradually add the room-temperature eggs.
Whip the softened butter with the powdered sugar until you get a light and fluffy mixture. Gradually add the room-temperature eggs.
;Resize,width=712;)
Incorporate the sifted flour, and the dough is ready. Take a small portion of the dough aside and add the red food coloring to make the hat. Transfer the mixtures into two separate piping bags with a star-nozzle tip. Shape the cookies on top of a baking tray lined with either baking paper of a silicone baking mat.
Incorporate the sifted flour, and the dough is ready. Take a small portion of the dough aside and add the red food coloring to make the hat. Transfer the mixtures into two separate piping bags with a star-nozzle tip. Shape the cookies on top of a baking tray lined with either baking paper of a silicone baking mat.
;Resize,width=712;)
Bake at 340F/170C for about 15 minutes. The cookies should be firm and set around the edges, but still light in color. After cooling, decorate them with royal icing or chocolate. Let the decorations dry and serve the delicious cookies (or gift them!). Enjoy!
Bake at 340F/170C for about 15 minutes. The cookies should be firm and set around the edges, but still light in color. After cooling, decorate them with royal icing or chocolate. Let the decorations dry and serve the delicious cookies (or gift them!). Enjoy!
;Resize,width=767;)
;Resize,width=712;)
;Resize,width=712;)

