
How to Make a DIY Piping Bag With Parchment Paper (With Video!)
A parchment paper piping bag, or cornet, is a simple yet essential tool for bakers, easily made by folding a parchment paper triangle into a cone. It’s cheap, customizable, and eliminates the hassle of cleaning up, and it's ideal for decorating cakes and pastries. Read ahead to find out how to make one and how to use it!

Being a baker means having an array of tools at your fingertips—each designed for precision, efficiency, and creativity. From the humble rolling pin to the sophisticated stand mixer, the toolkit of a baker can sometimes resemble that of an engineer. But would you ever believe that one of the most important tools in your kitchen is something as simple and accessible as parchment paper? That’s right! The parchment paper piping bag, also known as a cornet, is a baker's best-kept secret. Not only is it quick and easy to make, but once you get the hang of it, you'll wonder how you ever decorated without it. It’s one of those rare kitchen hacks that's easier done than said, and while we’ll do our best to explain it to you, a video might just do it justice. Still, let’s give it a whirl!
Why Every Baker Should Master the Parchment Paper Piping Bag
So, why should you bother learning how to make your own parchment paper piping bag? For starters, it's incredibly easy and cheap—two things every baker can appreciate. Store-bought piping bags are great, but they often require nozzles, which have a habit of disappearing at the worst times. With a parchment paper cornet, you can make as many bags as you need in a matter of minutes, and you won’t have to worry about washing up afterward. They’re sturdy enough to handle chocolate and frosting alike, and because you’re making them yourself, you can customize the size to suit whatever decorative whims you might have. Plus, there’s something deeply satisfying about crafting a tool with your own hands—it's like being MacGyver in the kitchen!
How to Create Your DIY Parchment Paper Bag Step-By-Step
Making your own parchment paper piping bag is a simple process, but it does require a bit of practice to perfect. Here’s how you do it:
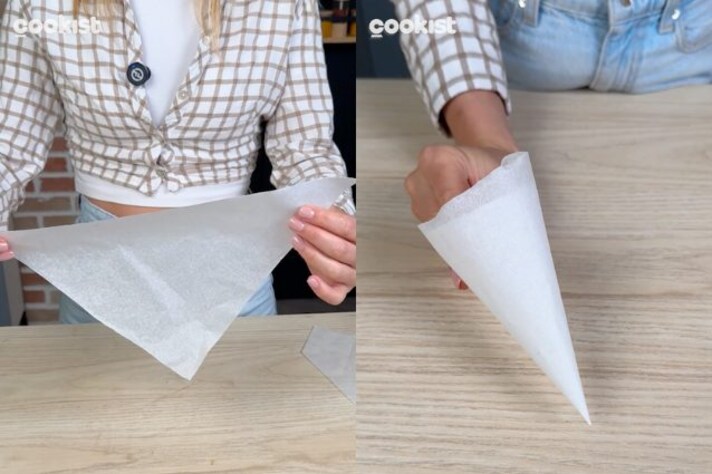
- Start with a sheet of parchment paper. Cut it into a triangle. The size of the triangle will determine the size of your piping bag. A larger triangle gives you a larger bag, perfect for big decorating jobs, while a smaller triangle is ideal for fine details.
- With the triangle in hand, take the two longer ends and fold them inward towards the middle. Imagine you’re trying to make them meet in the center like two old friends reconnecting after a long time apart. Cross these ends over each other, creating a cone shape.
- Now, fold the top edge of the triangle inward to lock everything in place. This fold is what will keep your cone from unraveling while you’re working. For added security, make two small tears at the top of the fold and tuck them inside the cone. Voila! Your cornet is ready to go.
The beauty of this DIY bag is that it’s fully customizable, so cut the tip as small or as large as you need for your design.
How to Use Your DIY Cornet
Now that you’ve made your parchment paper piping bag, it’s time to put it to use. Whether you’re adding intricate details to a cake or drizzling chocolate over pastries, your cornet is your new best friend. Start by filling the bag with your chosen medium, making sure not to overfill it—leave some room at the top to fold it over, which helps prevent any unwanted messes.
Hold the bag at the top where you folded it, with the tip pointing downwards. Applying gentle pressure, guide the bag as you pipe your design. Think of it like writing with a pen—the steadier your hand, the more precise your decorations will be. If you want to change the size of your piping, simply snip a bit more off the tip of the bag. And don’t forget, practice makes perfect! The more you use your cornet, the more control you’ll have over your designs.

The Do’s and Don’ts of Parchment Paper Cornets
While parchment paper piping bags are versatile, they do have their limits. Avoid filling them with anything too chunky or thick—chunks of nuts or large pieces of fruit will clog the tip and ruin your design. Similarly, overly hot or runny ingredients might cause the paper to soften or tear, leaving you with a sticky situation. Always ensure your fillings are smooth and cool enough to handle.
Another common mistake is not securing the top fold tightly enough. If this happens, the filling can ooze out the back as you’re piping, which can be frustrating and messy. Remember to fold the top edge inward securely and make those small tears for extra stability. Lastly, while it might be tempting to use the same cornet for multiple designs, it’s best to make a fresh one for each new filling. After all, they’re so easy to make, why not give each creation its own special bag?


;Resize,width=767;)
